Building an AM radio is a classic beginner project that feels like magic. You pull invisible signals out of thin air and turn them into voices and music. AM stands for Amplitude Modulation. This old technology provides one of the clearest ways to learn how electricity carries information across long distances. Once you build a simple receiver on your desk, you stop seeing radio as a mystery and start seeing it as a basic electrical circuit.
Catching Invisible Radio Waves
Radio stations pump massive amounts of electrical energy into the sky using giant towers. This energy travels outward as an electromagnetic wave. To catch this wave, you need an antenna. A basic wire antenna acts like a net, grabbing the tiny amounts of energy passing through your room. This energy creates a very faint, fast-moving electrical current in your wire.
Because thousands of signals hit your antenna at the same time, you need a way to filter them. You use a tuning circuit made of a coil of wire and a capacitor. Turning the dial on the capacitor changes the circuit’s preferred frequency. This blocks out all the unwanted stations and lets only your chosen signal pass through. Reading a solid radio frequency introduction explains how these different wave sizes travel through the air and interact with your copper wire.
Separating Audio From the Carrier Wave
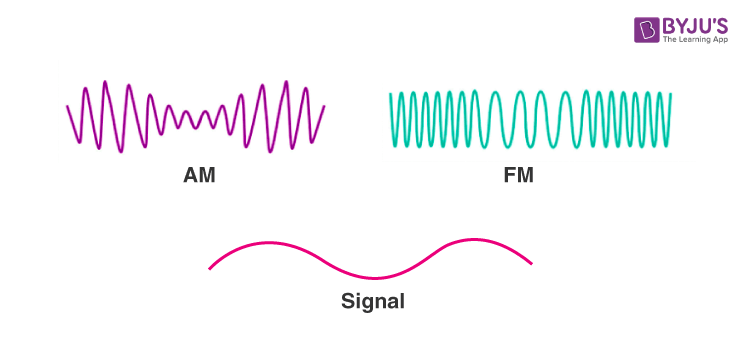
The signal your antenna catches contains two parts mixed together. The station uses a high-frequency carrier wave to push the signal across the city. They embed the actual audio by changing the height, or amplitude, of this carrier wave. Your circuit needs to strip away the carrier wave and keep only the audio shape.
You use a component called a diode to perform this task. The diode forces the alternating current to flow in only one direction. This chops the fast signal in half, leaving behind the smooth outline of the original voice or music. This process is called demodulation, and it isolates the data you actually want to hear.
| Signal Part | Function | What Happens to It |
| Carrier Wave | Pushes the signal through the air | Discarded by the receiver circuit |
| Amplitude Changes | Contains the actual audio information | Saved and sent to the speaker |
| Radio Frequency | Determines the station number | Used by the tuning dial to find the station |
Turning Signals Back Into Sound
The demodulated signal is now just a varying electrical voltage. This voltage remains incredibly weak. If you send it directly to a large speaker, you hear absolutely nothing. You must boost the power of this weak signal so it can push a physical speaker cone back and forth.
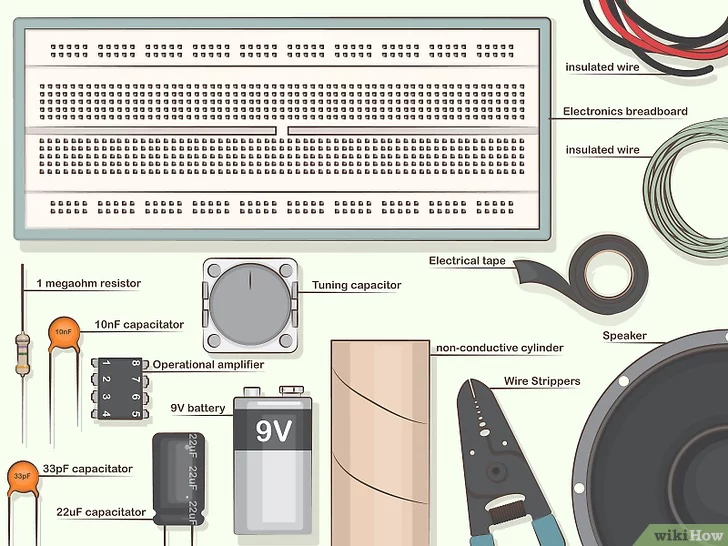
You add a small audio amplifier circuit to your breadboard. The amplifier takes power from your local battery pack and uses the weak radio signal as a template. It creates a much stronger copy of the audio wave. Applying the lessons from standard tech basics and concepts helps you wire this amplifier correctly without burning out your components. The strong signal pushes the magnet in the speaker, moving the air and creating the sound you hear.
Building Your First Receiver Circuit
Building an AM radio from scratch teaches you exactly how these invisible forces operate. You connect your antenna, your tuning coil, and your diode directly on a breadboard. You test the output with a small earpiece before wiring up a full speaker.
Starting with an AM receiver project is much easier than trying to build a complex FM or digital radio. The components are large, the math is simple, and the physical layout makes logical sense. For those looking to source the exact parts needed for a working receiver, a reliable DIY radio component guide lists the specific diodes and coils that work best for beginner builds. You assemble the parts, string a long wire across your room, and listen to the airwaves come alive.