If you’ve never soldered before, the first time you pick up a hot iron can feel… intense. The good news is you don’t need a fancy bench setup or years of experience to get a clean, working solder joint. You just need a simple solder project, a safe workspace, and a clear step-by-step process.
In this first soldering project guide, you’ll build a classic beginner circuit: a small LED + resistor “power light” on a practice board (a tiny PCB). It’s the perfect first win because it teaches you the basics—without dozens of parts or confusing troubleshooting.
What you’ll learn:
- How to set up safely (so soldering is not scary)
- What a “good joint” looks like
- The exact motion for making clean solder connections
- How to fix common mistakes (without panic)
Internal Tip: If you’re building with kids or in a classroom setting, start with safety and supervision first. See Safe Soldering Basics for Kids before you fire up an iron.
What You’ll Build: A Simple LED “Power Light”
This project is a tiny circuit that lights an LED when you apply power. Most practice boards or beginner soldering kits include this exact style of build because it teaches core skills:
- LED polarity (direction matters)
- Resistor placement (protects the LED)
- Making clean, reliable joints
- Trimming leads and inspecting work
If you’ve been learning on a breadboard, this is your next step: you’re making permanent connections on a circuit board. (If you’re brand new to boards, check What Is a Circuit Board? first.)
What You Need (Simple, Realistic Tool List)
You don’t need a lab. You just need the basics.
Tools
- Soldering iron (25–60W) (temperature-controlled is best)
- Iron stand (never set the iron directly on the table)
- Tip cleaner (brass wool is ideal; a damp sponge works too)
- Side cutters (to trim component legs)
- Tweezers (optional, but handy)
- Helping hands or a small clamp (optional, very helpful)
- Safety glasses (always)
Materials
- Lead-free rosin-core solder (common for beginner setups)
- Flux pen (optional but makes solder flow better)
- Practice PCB or beginner soldering kit (through-hole parts)
- LED + resistor (often included with kits)
Safety / Workspace
- Ventilation (open window + small fan is a good start)
- Heat-resistant mat or safe surface cover
If you want a quick primer on parts like resistors, wires, and LEDs, see Meet the Parts: Resistors, Wires, and Other Basic Electronics Components.
Safety Basics (Non-Negotiables)
Soldering is safe when you treat it like you’re working with a small, controlled heat source—because you are.
- The tip is hot enough to burn instantly. Assume it’s hot even if you “just turned it off.”
- Work in a ventilated area. You want fumes moving away from your face.
- Wear safety glasses. A clipped lead can fly farther than you think.
- Wash your hands after soldering. Especially before eating.
- Unplug the iron when you step away. Even for “just a minute.”
For a kid-friendly, classroom-friendly safety breakdown, read Safe Soldering Basics for Kids.
Quick Part Check: What You’re Soldering
Before you solder anything, it helps to know what you’re holding.
LED (Light-Emitting Diode)
- LEDs have polarity—they only work in one direction.
- The long leg is usually positive (+).
- The flat side of the LED often marks the negative side.
Resistor
- A resistor limits current so your LED doesn’t burn out.
- It doesn’t have polarity—you can place it either direction.
If you’re curious how these components connect in other builds, Breadboard 101 and Battery Basics are helpful foundations before and after this project.
Step-by-Step: Your First Solder Joints
This section is the heart of the guide. Go slow. Clean joints come from simple habits.
Step 1) Prep your station
- Put the iron in a stable stand.
- Turn it on and let it heat up fully.
- Clean the tip using brass wool or a damp sponge.
- Tin the tip: melt a tiny bit of solder onto the tip, then wipe lightly.
- A tinned tip transfers heat better and makes solder flow smoothly.
Step 2) Insert parts into the practice board
- Place the resistor and LED into the correct holes.
- Flip the board over while holding the parts in place.
- Slightly bend the leads outward so the parts don’t fall out.
Important: Make sure the LED is facing the right direction. Many boards label this with a “+” or a flat-side outline.
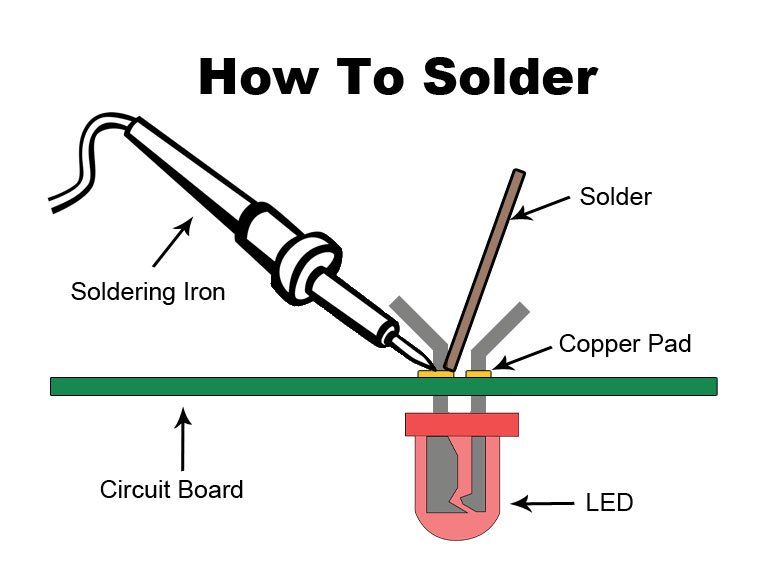
Step 3) Heat the pad and the lead together
This is the biggest beginner mistake: heating only the solder or only the tip.
- Place the iron tip so it touches:
- the metal pad on the board and
- the component lead
- Hold it there for about 1–2 seconds to warm both.
Step 4) Feed solder into the joint (not the tip)
- Touch solder to the heated pad/lead area—not directly to the iron.
- The solder should flow around the lead and form a smooth joint.
Step 5) Remove in the right order
- First, stop feeding solder.
- Then remove the solder wire.
- Then remove the iron.
Try not to wiggle the part while the solder cools.
Step 6) Inspect your joint
A good joint usually looks like:
- smooth and shiny
- shaped like a tiny volcano or cone
- not a blob, not a dull crusty lump
Step 7) Trim the leads
Use side cutters to trim the extra wire close to the solder joint.
Wear eye protection—those clipped ends can pop.
Common Mistakes (and Easy Fixes)
Everyone makes these at first. The trick is knowing what you’re seeing.
Cold joint (dull, rough, or cracked-looking)
Cause: The pad/lead wasn’t hot enough before solder was added.
Fix: Reheat the joint for 1–2 seconds until it flows and smooths out.
Too much solder (big blob)
Cause: Feeding too much solder or keeping solder on too long.
Fix: Reheat and gently pull away extra solder. If needed, use solder wick.
Solder bridge (two pads connected by solder)
Cause: Solder flowed where it shouldn’t.
Fix: Reheat and drag the tip away from the bridge. Flux helps. Wick works too.
Lifted pad (pad pulls up from the board)
Cause: Too much heat for too long, or pushing hard with the tip.
Fix: Don’t press. Use a lighter touch and shorter heat time. If the pad is damaged, that board may be a “learning board” now—and that’s okay.
Quick Test: Make Sure It Works
Once your parts are soldered and leads are trimmed, it’s time for the fun part.
Test it safely
- If your board uses a battery pack, connect it.
- If you’re using a bench power supply, use a safe low voltage recommended by the kit.
If the LED lights up: you did it.
If the LED doesn’t light
Work through this checklist:
- LED polarity: Is it installed backward?
- Bad joint: Do any joints look dull, cracked, or incomplete?
- Bridge: Are two pads accidentally connected?
- Resistor placement: Is it in the correct spot?
If you’re powering it from a battery pack, Battery Basics can help you confirm polarity and voltage expectations.
Next Projects After You Nail This
Once you can solder clean joints reliably, a bunch of fun projects become “easy”:
- Soldering pin headers (great for microcontroller boards)
- Adding a switch + LED circuit
- A simple buzzer build
- Beginner kits that teach sensors and outputs
And if you’ve been building circuits on a breadboard, this is also when it starts to make sense to compare “temporary” breadboard wiring vs “permanent” soldered connections.
Wrap-Up: You’re Officially a Builder Now
Your first soldering project is less about perfection and more about learning what solder is supposed to do: create a clean, reliable electrical connection. The best way to get good fast is to make more joints—seriously, your hands learn quicker than your brain.
If you want to practice, do 10–20 joints on a spare practice board and focus on just two habits:
- heat pad + lead together
- feed solder into the joint, not the tip
That’s the foundation of almost every electronics kit build you’ll do from here.