Motors are the moment when electronics starts to feel like magic—and understanding motor basics is where that magic begins. LEDs blink and buzzers beep, but a motor takes invisible electricity and turns it into real motion you can see and feel—wheels spinning, fans blowing, and little robots scooting across the table.
If you’re new to electronics kits, motors can also be the first component that “doesn’t behave.” An LED usually works with almost any battery and a resistor. A motor might sputter, stall, or make your entire project reset. That’s not because motors are mysterious—it’s because motors demand more power and need the right control parts.
This guide breaks down motor basics in beginner-friendly terms: how motors create motion, the main motor types you’ll see in kits, and how to power and control them safely.
What Is an Electric Motor?
An electric motor is a device that converts electrical energy into mechanical energy (motion). It does this using two key ideas:
- Electricity can create magnetism.
- Magnets can push and pull.
When the motor’s magnetic forces are arranged so they keep “chasing” each other in a circle, the motor spins.
The Big Concept: Electricity Makes a Magnetic Field
Inside many motors is a coil of wire. When current flows through that coil, it creates a magnetic field—making the coil act like an electromagnet.
If you place that electromagnet near a permanent magnet, the two magnetic fields interact. The motor is designed so those interactions create a turning force called torque.
Torque is the twisting force that makes the motor shaft rotate.
How a Simple DC Motor Spins (Beginner Version)
The most common motor in beginner electronics kits is a DC brushed motor (a small cylinder motor with two wires).
Here’s what’s happening inside:
- Current enters the motor through brushes (conductive contacts).
- The current flows into a coil of wire inside the motor.
- The coil becomes an electromagnet.
- The electromagnet is pushed/pulled by the motor’s permanent magnets.
- A part called the commutator flips the direction of current at the right time.
- That flipping keeps the coil “chasing” the magnetic field—so it keeps spinning.
The key: the motor needs the current direction to switch at just the right time so the spinning doesn’t stop. In a brushed motor, the brushes + commutator handle this automatically.
Motor Types You’ll See in Beginner Projects
1) DC Brushed Motor (two wires)
Best for: simple spinning motion (fans, wheels, spinners)
How you power it: connect to a battery pack (with proper control and safety)
How you reverse it: swap the wires (polarity)
2) Servo Motor (three wires)
Servos are popular in robotics kits because they move to a specific angle (like 0° to 180°).
Wires are usually:
- power (V+)
- ground (GND)
- signal (control)
Servos are “smart motors” because they include gears and a control circuit inside. They need a stable power source and a control signal, often from a microcontroller.
3) Stepper Motor (multiple wires)
Steppers move in small steps and are used when you want precise positioning (like a simple CNC or turntable). They are less common in very early kits because they need a driver circuit.
Why Motors Are Harder Than LEDs
Motors draw much more current than LEDs. Even a tiny motor can pull a big burst of current when it starts.
Two common motor facts that explain most beginner problems:
1) Motors have a “startup surge”
When a motor is stopped, it can draw a lot of current for a brief moment to overcome inertia. If your batteries are weak, the voltage may dip.
2) Motors create electrical noise
Motors are coils of wire, and switching them on/off can create spikes. Those spikes can cause:
- flickering LEDs
- weird sensor readings
- microcontroller resets
This is why motor circuits often include protection parts (more below).
For a deeper look at power limits, check out our battery guide.
Powering Motors Safely
Choose the right power source
Motors don’t just need “enough voltage.” They need a source that can supply current.
- AA battery packs are often better than a rectangular 9V battery for motors.
- Rechargeable NiMH AAs can deliver strong current.
- For robotics, people often use LiPo packs—but those require careful handling and correct chargers.
A motor that “works on USB but not on battery” is usually a current problem, not a wiring problem.
Avoid powering motors directly from microcontroller pins
If you’re using a microcontroller board, never connect a motor directly to an output pin. Pins are designed for small signals, not motor current.
Instead, use a transistor or motor driver so the microcontroller controls the motor safely.
The Easiest Way to Control a DC Motor
1) On/Off control with a switch
The simplest setup is:
Battery → switch → motor → battery
Check out our switches and button guide to learn more.
But switches don’t solve the bigger issue: motors can create spikes when turning off.
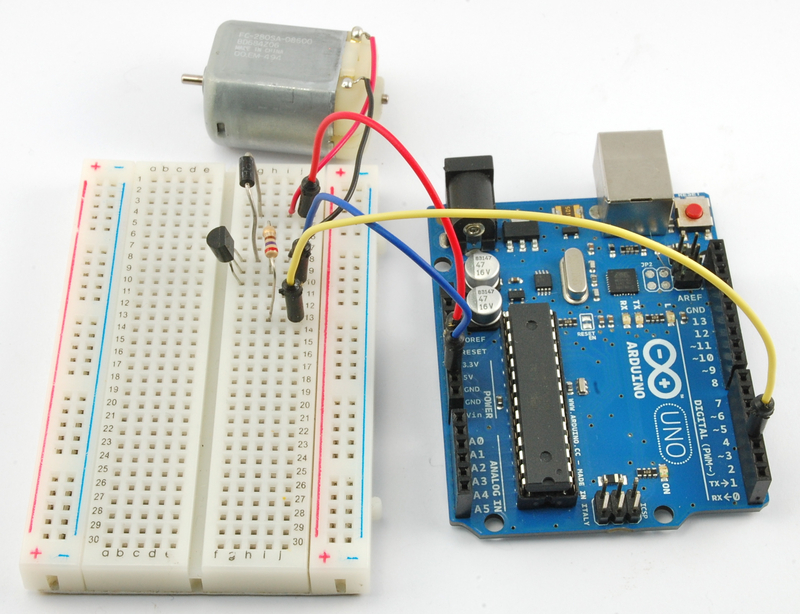
2) On/Off control with a transistor (recommended)
A transistor acts like an electronic switch. A small signal can control a larger current safely.
Beginner-friendly idea:
- button or circuit output controls the transistor
- transistor controls the motor current
This is how you scale up from “tiny circuits” to “real power devices.”
The Most Important Safety Part: The Flyback Diode
When you turn a motor off, the magnetic field inside the coil collapses. That collapsing field can create a voltage spike that tries to keep current flowing. The spike can damage sensitive parts.
A flyback diode (sometimes called a freewheel diode) gives that current a safe path.
In many DC motor circuits, you place a diode across the motor terminals (in reverse direction relative to normal power flow). That way:
- the diode does nothing while the motor runs
- but it protects the circuit when the motor switches off
Beginner takeaway: If your kit includes a diode and you’re driving a motor, it’s probably there for protection.
Quick Troubleshooting: Common Motor Problems
“My motor doesn’t spin”
- Batteries are weak or wrong type
- Loose breadboard connection
- Not enough voltage for that motor
- Motor is stalled (something blocking the shaft)
“Motor spins, but everything else glitches”
- Voltage sag from current surge
- Motor noise affecting the circuit
- You need better power separation or a diode/capacitor
“It gets hot fast”
- Motor is overloaded or stalled
- Voltage is too high
- Wiring is shorting
Rule: If a motor can’t turn freely, don’t keep power on. Stalled motors draw high current and heat quickly.
Beginner Project Ideas Using Motors
Once you understand motor basics electronics, here are fun next steps:
- Mini fan (motor + paper propeller)
- Spin art (motor + small platform for markers)
- Brush bot (vibration motor + toothbrush head)
- Button-controlled spinner (motor + switch input)
- Obstacle robot (advanced) (motor + sensor + driver)
Motors are perfect for spring build season because they turn learning into something you can show off.
The Main Takeaway
Motors create motion using magnetism: current makes a magnetic field, magnetic forces create torque, and the motor is designed to keep that torque spinning. The most important beginner lesson is that motors need more current and create more electrical noise than most other kit parts—so they require safer powering and smarter control.
If you build with fresh batteries, avoid overloading the motor, and use the right control/protection parts (like a transistor and flyback diode), motors become one of the most exciting and reliable components in your kit.
If you tell me what kind of motor your kit uses (DC motor, servo, or stepper) and what voltage you’re powering it with, I can add a short “First Motor Test” mini-project section with a wiring diagram-style description for your exact setup.